
Blueprint for Success

Planning and the Overall Process:
• “If you fail to plan, you are planning to fail.” - Benjamin Franklin.
• Involve a team of teachers, parents and even children in the design process.
• Make sure that your architect and designer have a comprehensive knowledge of preschoolers and children.
• Be aware of state and local fire codes and the Americans with Disabilities Act standards for children (ADA standards are different for children than for adults).
• Find churches and schools in your area who built in the last few years and ask them what they liked, what they disliked and what they would do differently. Tour other campuses, ask lots of questions and take lots of pictures!
• Allow enough time for the design process.
• Know your must-haves (“needs”) and what’s optional (“wants”). Be open to compromise but know what elements are necessary to make a great learning environment.
• Involve your community with events like a ground breaking, a building dedication, a grand opening or an open house.
• Understand that special events like Fall Festivals or Vacation Bible School may need to be modified or canceled due to construction.
• Be aware that changes made during construction (“change orders”) may delay completion and incur additional costs. Some modifications can be extremely costly.
• Expect the unexpected!
Building Design:
• “Design is not just what it looks like and feels like. Design is how it works.” - Steve Jobs
• When budgeting, consider the quality, durability and reliability of goods and services. Sometimes “inexpensive” translates to lesser quality. Paying less may cost more in the long run.
• Make sure your windows are low enough for children to have a clear view but not low enough to facilitate climbing. Don’t plant shrubbery outside ground floor windows that could block the view!
• Assign the ages of children that will use each room during the design process. In most instances, order the rooms by ages with the infants, toddlers and special needs children on ground floor levels closest to the check-in area.
• Plan your classroom size (square footage) to maximize occupancy in correlation with educational and child care requirements for each age group.
• Each classroom should be designed with at least two unobstructed exit paths.
• Double entry locked doors enhance the building’s access control system. Keyless systems, remote locking systems, and camera systems should also be considered for security purposes at every access point to your building.
• Angled or recessed doorways and offset/staggered doorways into each classroom are structural techniques that can help keep hallways open and traffic flowing during busy times.
• Include an indoor play space even if it can only be a small classroom size.
• In infant/toddler areas, plan space for stroller parking and for infant carrier storage.
• When planning restrooms for the little ones, don’t forget the toddlers who may be potty training. Also make sure you have enough adult restrooms.
• A large room without built-ins can serve as a great multipurpose room for parent/volunteer events, staff meetings, and training sessions.
• Oversize your doorways to make room for strollers, buggies and parents carrying infants in carriers.
• Hallways need adequate electrical outlets for use by custodial staff and for special events.
• Plan for future growth. Many polled had already outgrown their new facility. Consider building a “shell space” that is unfinished.
Classroom Design:
• The classroom environment should welcome and actively engage children. Remember that play is the work of the child and the proven method from which they learn.
• Design the room with different textures to create sensory experiences for the children. Texture may be incorporated in the walls, ceilings and floor surfaces.
• Consider each room’s tile-to-carpet ratio. Many surveyed said they didn’t plan for enough tile. Some said they don’t want carpet at all next time! We have heard good reviews on replaceable, commercial-grade carpet squares.
• Good lighting is essential for visual activity and has a positive effect on the physical and mental mood of children. Natural light is a hallmark of a nurturing environment.
• When designing the interior space, consider the layout of your furniture and equipment:
o Where will each learning center be located?
o Where will cots or rest mats be stored?
o Is there room for a changing table, art center, and sensory table by the sink?
o Is there enough space in infant rooms for bulky furniture like cribs, feeding tables and changing tables?
• Let children’s artwork and other projects become a part of the scenery of the classroom. Design each classroom with the goal of displaying the children’s creations being mindful of their sight lines, not adult sight lines.
• Pay attention to the room’s acoustics. Consider using an acoustic engineer for large meeting spaces like children’s worship areas, cafeterias and libraries.
• Make sure adequate counter space and built-in storage have been provided-no one polled had built too much.
• Several suggested a “cutout” on a counter top with a trashcan enclosed underneath the cutout.
• Consider dimmer lights over the changing area so that it can still be used during nap time.
• Place permanent fixtures like water fountains, cafeteria serving counters and sinks with the child’s height in mind.
• Sinks in the classrooms are a plus. Child height water fountains are beneficial as well except in toddler areas. If the sinks and water fountains aren’t child height, plan ahead and order step stools.
• Phone, computer and television cords need to stay out of reach of children.
• Regarding Wi-Fi and fiber optics, plan for the future with multiple hotspots and computer drop lines for networking.
• Choose color to create a peaceful environment. Don’t overpower the room with bold murals or wall color but rather use the color to enhance the learning environment.
Equipping Your Classroom:
• The furnishings and equipment of each classroom provides the actual physical environment that showcases the most visible aspect of your program’s quality. Focus on creating a warm, inviting atmosphere for children.
• Classroom furniture and equipment must be designed for classroom use.
• Focus on quality and durability. Trying to get the most for the least amount of money without considering quality can be costly in the long run.
• Make sure that each classroom’s furniture is age appropriate and will inspire children’s creativity and learning.
o Toddlers love to climb on furniture so provide soft play furnishings that are designed to safely accommodate their climbing tendencies.
o The height and placement of shelving units should be low enough for teachers to see the children at all times.
o Homeliving furniture like stoves and sinks with no doors work best for toddlers and 2-year olds.
• Tables and chairs need to be carefully considered.
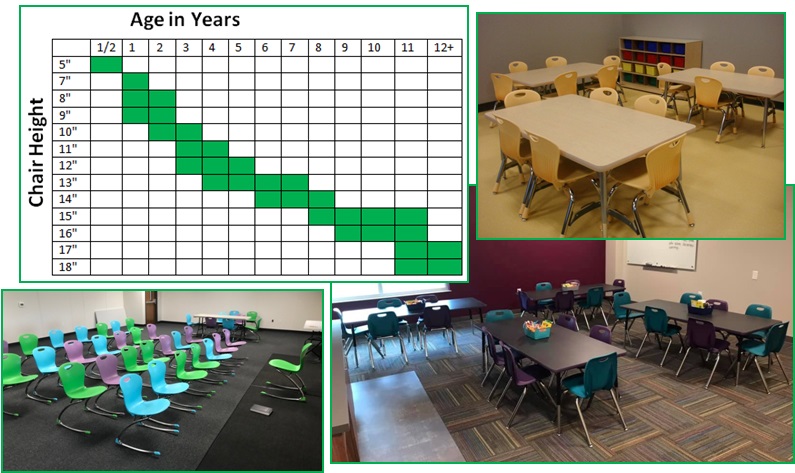
o Proper chair height is extremely important in facilitating the learning process. Are the child’s feet touching the floor?
o Choose color carefully. Will the selection still look fresh and current 10 years from now?
o Does the table height adjust? Are the chairs the correct height for the tables?
• A wall mounted mirror behind the changing table is engaging for the child and gives the caregiver a view of the classroom.
• Changing tables with steps can be a wonderful aid for teachers in toddler classrooms.
• Keep bulletin boards and marker boards with the child’s eye level in mind.
• Don’t forget smaller but necessary items like trash cans and clocks. As an aid for “move-in day,” label each trash can with a room number and then put things like tissues, stapler, small toys, etc. inside the trash can and deliver to the classrooms.
• Don’t over-equip classrooms. Plan so that the furniture and equipment can be easily placed for defining learning centers without becoming too crowded. Selections should blend and bring harmony to all classroom spaces.